Progress on the Fiero dash – AUX gauges
Today I added the auxiliary (AUX) gauges to the dash – voltmeter and oil pressure gauges. I re-used the old plastic housing piece because it gave a mounting fixture for the gauges. It involved a little cutting because the pig-tail wire that plugs into the…
Fiero middle armrest console
Today I finished installing the middle armrest console – it involved a little bit of trimming. Unfortunately it has a rather large gap on the passenger side – i’ll need to get creative to solve that. I also started mounting the switches. I did not…
Fiero dash mounting brackets are done
Today I finished mounting the dash to the chassis – driver and passenger sides. With the driver’s side, I re-used the old Fiero dash bracket to mount the hood release. On the passenger side I also re-used the old Fiero bracket – I created rubber…
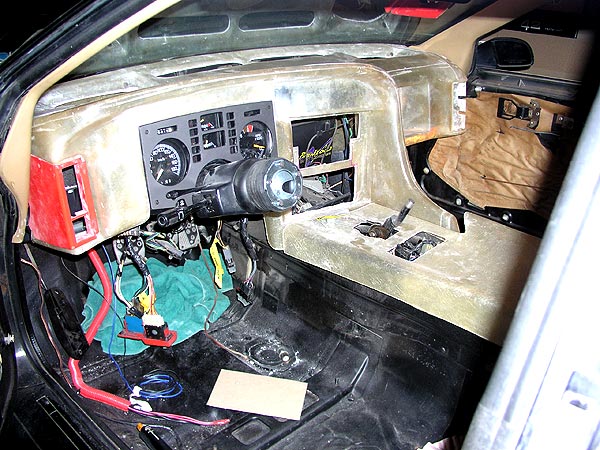
Fiero PISA dash – installation of the instrument cluster
In order to successfully mount the main Fiero instrument cluster, I needed to drop the steering column. Once it was disconnected, I could properly mount the gauges. Note that the original location for the “hidden” cluster mount actually maintains alignment – but it’s “underneath” the…
Fiero dash is partially installed
The PISA dash is partially installed. I have drilled and mounted the upper points – near the speakers. The HVAC ducting is not in place yet. Once I get the dash roughed in, I will pull it out and install the ducts. Sorry for the…
Fiero dash speakers and HVAC vents
I had some time today to cut out the holes for the dash speakers and the HVAC vents. I used a cardboard template to help transfer the hole locations.
A little progress on the Fiero dash
I had some spare time today to cut out the radio console.
Fiero dash continues
I made a few more cuts, and now it can fit inside the Fiero. I’ll need to do some trimming but the overall fitment isn’t too bad.
Fiero custom dash progress
I began cutting out the holes for the different dash components. It’s a tedious process, but it is turning out well.
More progress
A few goodies arrived for the Fiero: – A set of 16″ Z24 Cavalier rims with 90% tread left – picked these up for $100!; – Amber LED marker lights that are flush mounted; and – LED switches with chrome aircraft guards. I also made…
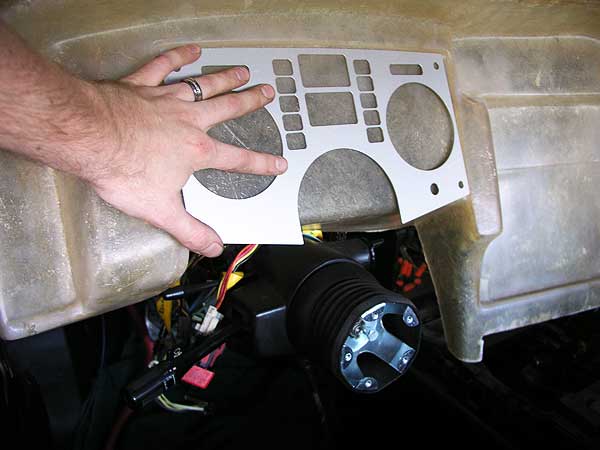
Custom Fiero dash
I began to test fit the PISA wrap-around dash. It will require some specific cuts and custom brackets to fit properly.
Chevrolet Colorado rear drum replacement
The rear drums on my Colorado have been squealing for a few months now, so I decided to replace them. I bought new shoes and drums – although you can have your drums turned down if you wish. The process of changing the drums was…
Fiero deck-lid scoop installation – Part 2
I have completed the installation of the rear deck-lid scoop. By using the cardboard template, …it made drilling the holes an easy process. After it was mounted, I needed to make this scoop functional so it would help reduce the temperatures under the hood. I…

Fiero mustang scoop installation
I’m getting ready to attach the mustang scoop to the rear deck-lid. I came up with an idea using cardboard – the cardboard would act as a template for drilling holes. It seems to be turning out well. I’ll wait until the morning for better…
Front bumper is finished
I have completed the electrical work on the front bumper, and it is now FULLY installed on the Fiero.

Fiero front bumper electrical work
Marker light, halo, and fog light installation on the front bumper – mostly electrical work.
Ferrari 355 bumper test fit
I had a chance to test fit the bumper tonight. It slides on quite nicely. There are a few fitment issues, but they are easy fixes. It completely transforms the look of the car.
Fiero battery box is installed
I completed the battery box installation tonight. The only problem is that the battery I was using doesn’t fit inside it anymore. The rubber sheets I used shrank the inner dimension by a 1/4″. It NEVER ends. So now i need a smaller battery.
Fiero battery box restoration completed
With a fresh coat of paint, and rubber padding to insulate the battery, the battery box restoration is now complete. It just needs to be re-installed into the car.

Fiero strut tower bar
I bought this over a year ago, and decided that it was time to install it. It is the “Darrell Morse” strut tower bar for 84-87 Fieros.

Building a shed – Part 3 (complete)
Today the shed installation was completed. Installation began about 10 a.m. in the morning, and it was finished about 12:30 p.m. – 2.5 hours total. I’ll let the pictures do the rest of the talking :)
Building a shed base – Part 2
I required almost 2 FULL yards of limestone to make up for the grade of the backyard. In order to completely finish off the support, I used 2x10x10 pressure treated boards with 2′ rebar to support the limestone – this will help it stay in…
Restoring the front of the Fiero
Before I install the Ferrari bumper, I need to restore the original internal bumper. I used a wire brush wheel, and a grinder to remove the rust. I applied a coating of rust converter, and then two coats of rocker guard.
Fiero battery box
This is part of the restoration, …that I paid lots of money for a few years back, …that PISSED me off the most. The battery box that was installed, …was done so piss-poorly, …it makes me laugh. First off, the battery box was made out…