Category: Fiero

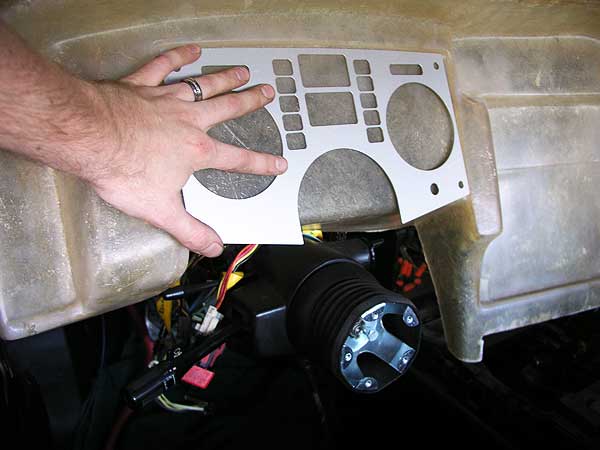
Custom Fiero dash
I began to test fit the PISA wrap-around dash. It will require some specific cuts and custom brackets to fit properly.

Fiero deck-lid scoop installation – Part 2
I have completed the installation of the rear deck-lid scoop. By using the cardboard template, …it made drilling the holes an easy process. After it was mounted, I needed to make this scoop functional so it would help reduce the temperatures under the hood. I…

Fiero mustang scoop installation
I’m getting ready to attach the mustang scoop to the rear deck-lid. I came up with an idea using cardboard – the cardboard would act as a template for drilling holes. It seems to be turning out well. I’ll wait until the morning for better…

Front bumper is finished
I have completed the electrical work on the front bumper, and it is now FULLY installed on the Fiero.

Fiero front bumper electrical work
Marker light, halo, and fog light installation on the front bumper – mostly electrical work.

Ferrari 355 bumper test fit
I had a chance to test fit the bumper tonight. It slides on quite nicely. There are a few fitment issues, but they are easy fixes. It completely transforms the look of the car.

Fiero battery box is installed
I completed the battery box installation tonight. The only problem is that the battery I was using doesn’t fit inside it anymore. The rubber sheets I used shrank the inner dimension by a 1/4″. It NEVER ends. So now i need a smaller battery.

Fiero battery box restoration completed
With a fresh coat of paint, and rubber padding to insulate the battery, the battery box restoration is now complete. It just needs to be re-installed into the car.

Fiero strut tower bar
I bought this over a year ago, and decided that it was time to install it. It is the “Darrell Morse” strut tower bar for 84-87 Fieros.

Restoring the front of the Fiero
Before I install the Ferrari bumper, I need to restore the original internal bumper. I used a wire brush wheel, and a grinder to remove the rust. I applied a coating of rust converter, and then two coats of rocker guard.

Fiero battery box
This is part of the restoration, …that I paid lots of money for a few years back, …that PISSED me off the most. The battery box that was installed, …was done so piss-poorly, …it makes me laugh. First off, the battery box was made out…

Fiero scoops are installed
I’ve successfully installed the quarter panel scoops. I have a bit of an issue with the drivers side scoop, and the gab between it and the drivers door. The gap is tight, but it still fits.

Prepping the Fiero scoops for installation
Since the floor pan restoration is complete, I have time now to focus on other installations. Today I started prepping the scoops for installation.

Fiero floor pan is DONE
I have sealed the welds underneath with a silicone based adhesive, and then I painted over everything with rocker guard. For the interior welds I used “liquid-metal” and then gave it a thorough sanding to smooth everything out. A few coats of rocker guard finished…

More floor pan welding
I had some time this weekend to finish off the rest of the floor pan welds. I had to jack the Fiero up so I could get underneath to complete the extra welds needed.

Fiero floor pan plates are welded in
It has been a while since I’ve had a chance to work on the Fiero, but today I welded in the floor pan plates.

Fiero Comp Cam specs
I finally found the Comp Cam spec sheet for my Fiero. This sheet specifies the duration and lift of the cam I have installed in the 3.4L motor. This is a nice cam, it boosts the lower end torque, and it provides the Fiero with…

Pieces are cut for the Fiero floor pan
I finished cutting the metal pieces to replace the sections I removed a few weeks ago. I will tack-weld them in place and paint them with rocker guard. Once that is done, I can install the new carpet :)

Fiero floor pan restoration – hit a snag
As I was beginning to finish up the floor pan painting I noticed that a part of the driver’s side sheet metal (near the rear firewall) was bulging up in one area. So i took a closer look, and then i pushed down on the…

Fiero mustang scoop for the rear deck-lid
I bought this on ebay for $54, and I’m quite pleased with it – the fiberglass work is well done. The scoop will not only be used for aesthetics, but it will also be functional as well. I will need to cut a venting hole…

Fiero floor pan restoration
I spray painted the floor pans of the Fiero with a rubberized paint which also acts as a sound insulator. Looks good :)

Ferrari 355 tail lights for the Fiero
Since I finished the rear bumper installation, it was time to install these. They are AWESOME. The LEDs are super bright. Installation was straight forward – I just spliced into the existing tail light wires.

Finishing the installation of the Fiero rear bumper
This was over a few weekends, and not just one day. The rear bumper was stripped down with a grinder, .. a rust converter was applied, and then it was painted with a special rock guard compound. Everything was put back together, and then I…


